Sunday 29 June 2014

My everyday makeup.


Before 

After
Hello everyone, today I am going to be writing a blog post about my everyday makeup look! I hope you enjoy this blog, and there will be more like this soon!


The first thing I do for my everyday makeup is apply a small amount of the primer, I used the Monu illuminating primer. I got this product in a Glossybox, I have used it everyday since I have had it and even tho it is a sample size product it has lasted quiet a while so I will defiantly be purchasing the full size product when I run out. 


The second thing I do is apply my eyeliner, I use the Rimmel London gel eye liner. I have already written a review about this product so feel free to check it out :)  http://simplybeautybycatherine.blogspot.co.uk/2014/06/maybelline-falsies-mascara-and-rimmel.html. It is really easy to use, it last for ages and  its waterproof. I love everything about this eyeliner. I apply a thin coat along the lash line, I then go back over the line I have made and I make it thicker, I also add a flick! 


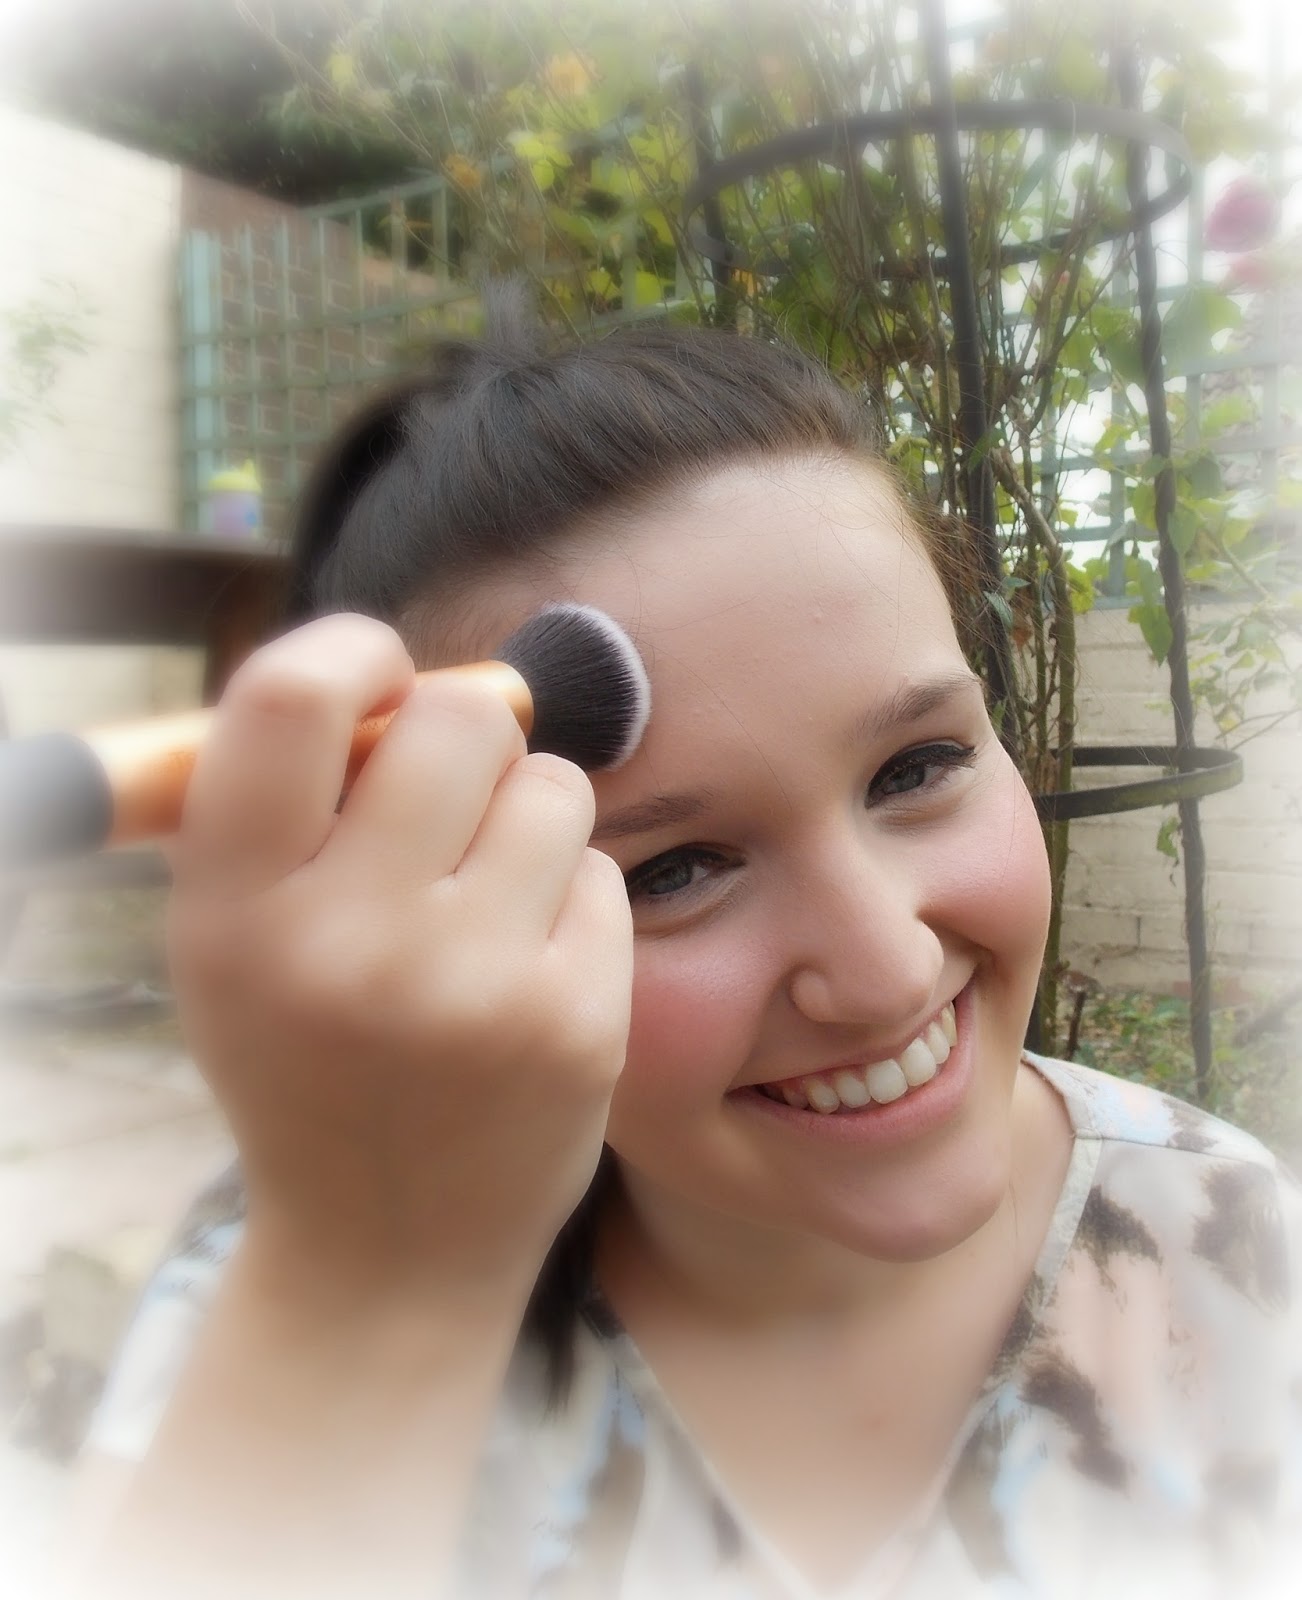
The third thing I do is apply the Rimmel London Match Perfection foundation in the shade 200 soft beige because i would say i have quiet a pale complexion . I use one pump of this product and I dab some on my cheeks, nose, forehead and my chin. I use the real techniques expert face brush because they are really good brushes they are soft and blend out your foundation really well. I blend this in a circular motion until the foundation is blended out nice and evenly. 


The fourth thing I do is apply the Collection Lasting Perfection concealer in the shade fair 1. I apply this under my eyes as I have bad dark circles, I also apply this on any blemishes I have. I love the coverage of this concealer, it covers things really well! I again use the real techniques expert face brush to blend it out so it covers all my blemishes and my dark circles. 


The fifth thing I do is apply the Natural Collection pressed powder in the shade warm. I apply this to my T zone with the real techniques buffing brush. This powder is really good to stop your foundation from looking oily. 


The sixth thing I do is add some of the So Susan blush to my real techniques contour brush. You only need a tiny bit of this blush.

I then smile and apply the blush to the apples of my cheeks and I blend it up to my hair line. I love this blush because it gives a natural looking flush to your cheeks. I have also wrote a mini review of this product http://simplybeautybycatherine.blogspot.co.uk/2014/06/glossybox-june-2014.html.


The seventh thing I do is curl my eyelashes, i find that it makes it easier to apply my mascara and because my eyelashes  grow downwards rather than curl up this helps to curl them I got this eye lash curler from Asda years ago! It still works though lol!


The eighth thing I do is apply my mascara on my upper lashes, I use the Maybelline Big Eyes volum express in waterproof. I love this mascara it makes your lashes long whilst looking natural at the same time. I also got this mascara from my Glossybox a couple of months ago. When this mascara drys up I will defiantly be purchasing a new one!


I then use the other end for my lower lashes, I only apply a tiny bit of this because my lower lashes are naturally quiet long and dark. 


The last thing I do is apply lipstick and the lipstick I have used in this picture is the Rimmel London Kate lipstick in the colour 05. I love this product because it applies smoothly to the lips and the colour is amazing. 


I hope this blog can help you in anyway like other blogs has helped me :) thanks for all the views feel free to leave a message if there is anything you would like me to review or talk about! 


Tuesday 24 June 2014

I passed my driving test!!

I Passed My Driving Test!!
Me with my certificate

 
Hello everyone, Hope your all okay?
I was going to post this a couple of days after I had passed my driving test but I wasn't sure weather to write a blog post about it as its not related to beauty, but then I thought some people would be interested to hear my experience of my test. I first started doing my lessons with a driving school when I was sixteen I really did enjoy my lessons with that driving school but I felt like I wasnt getting anywhere, I just felt like it was lesson after lesson with no end goal. I then booked my theory test but I didnt revise and I failed ( teach me right lol) I then done it again and failed. I eventually got the theory test disk and made sure I revised so I was ready for my test, I then passed my test! :) I was so nervous, I generally am a nervous person as it is, I literally worry about everything lol. Once I had passed my theory test I didnt have enough money to carry on with my lessons so I didnt do them for a while. Once the money picked up I rang my instructor and said to her that im ready to do my lessons and she said that shes got to many students and that she couldnt teach me, so I then went on to facebook and wrote a status " Does anyone know any good driving schools" My friends wrote back that Portland driving school was really good!! So I got the driving schools number and spoke to a man called Ashley and he was going to be my instructor. I started doing my lessons in February. Ashley made me feel at ease and he asked me how many lessons I had done. On the day of my first lesson I felt nervous, Ashley came and he asked if I wanted to drive or if he I wanted him to drive me somewhere quiet and then I drive. He was really chatty and just made me feel comfortable on my lessons! I drove home and he said about booking my test in april time as I was a good driver. That day I went home and booked my test! During the time of waiting for my test I done maneuvers I did three point turn, reverse round the corner, parallel parking and I also had to do emergency stop. The day of my test day finally came, I was so nervous that morning! I had a two hour lesson before my test and in them two hours I drove down to the test centre and down a quiet road where I done my maneuvers. My two hour lesson went really well before the test, I then went into the test centre with my driving instructor and waited them to call me for my test. The examiner called my name and I went outside to my instructors car, I then started my test, I drove down a quiet road and I had to do a three point turn, I then was driving round and literally ten minutes before the end of my test I was coming out of a junction and a car from no where pulled out on me and the car beeped at me! I then carried on driving back to the test center and when I got back the examiner said that I had failed my test by one major and 7 minors! he said that if it wasnt for that car that came from no where that I would of passed!! I was very disappointed that I had failed but I just thought to myself that I could always do it again. A couple of days after that I then went onto where you book the driving test and booked my test, I had to wait from April till June to do my test again! In that time I carried on doing my lessons till that date. The day of my test was friday 13th June, we have no luck my family so I was hoping it could be a good day for me lol! My instructor picked me up and hour and a half before my test and we drove down to the test center, I felt like the lesson before my test was really bad and I really thought that I was going to fail again! I went on my test and I felt like that time I done so much better, I done a three point turn again then I did an emergency stop, I drove back to the test centre and I pulled up outside and the examiner said that I had passed my test! I was so pleased that I had finally passed my test! I am so happy that I went with Portland driving school as I learnt to drive so quickly! Now I am just waiting to get a car aha!

I know this post was a bit different but I thought you might like to read about passing my test!

I will be writing a beauty blog soon so keep a eye out! :)
Thanks for reading!
Love Catherine x


Friday 20 June 2014

Glossybox June 2014


Hello everyone! I hope your all okay?
Today I am going to be doing a post about the June Glossybox. I have been subscribed to Glossybox for six months now and have to say I love it! When you subscribe to Glossybox you have to fill out a form which asks you which kind of beauty products you would find most useful, you can choose from skin care, make-up and hair care depending on what you prefer. The Glossybox comes with a magazine and a product card telling you where you can purchase the products from and the prices. Sometimes you will find that you will receive samples rather than the full size products but you do always receive at least one or two full size products. Glossybox have done extremely well in how they pack the products, the products are always surrounded by black card shavings ( I think this is what its called lol!) and wrapped with black tissue paper then tied beautifully with a ribbon with Glossybox printed on it. The value of this months Glossybox was worth a minimum of £45!! I only pay £10 a month for the subscription!

This is what the Glossybox looks like inside,
(Dont worry I have moved the products they dont come looking like this lol!) 

                                                       Qv Skin lotion
                     

This is the Qv skin lotion, this is the first product I tried when I received my Glossybox. I used this product on my face as I suffer from dry skin. To be honest when i first use this product I found that the consistency was watery and feels the same when rubbing it on to the skin. Once applied my skin felt very sticky and that feeling lasted for about twenty minutes or so, although once the product absorbed into my skin I must say that my skin did feel very soft and it was still soft when I woke up in the morning which I was surprised about. I will be defiantly purchasing the full size product, I have struggled to find a product that left has my skin feeling so soft even though at first it seemed very watery so I didn't expect it to be as good as it was!!  The cost of the full size product cost £6.06 for a 250ml from http://www.crawfordhealthcare.com/product/skin-lotion
                             
                        Nailgirls 3-in-1/base/topcoat & nail strengthener
 

This is the Nailgirl 3-in-1/base/topcoat & nail strengthener, I never usually use a base coat as I have never found one that gives a smooth coat across the whole of my nail when the nail polish/paint itself is applied, I always find that they tend to leave my nails looking streaky and not smooth which is a pain in the bum!! Another plus about this product is when I remove dark colours from my nails the base coat stops the nail polish from staining my nails. I like the fact that this product is a multi purpose product, there is nothing worse than carrying around three separate products which 9 times out of 10 I cant find one of them!! Where as with Nailgirls its all in one!! The one down side about this product is that the brush bristles are clear in colour so when you paint this on as a top coat the colour from the polish tends to stain the brush. I do not know that if in time this will effect the colour of the liquid in the nailgirl product. I found that the top coat of this product leaves your nail polish looking glossy and keeps it from chipping so easily.  The full size of this product cost £13.50 for a 15ml. I would of put the link to where you can buy the product but currently the nailgirls are not showing it on there website, this could be because its a new launch and they haven't updated there website. But here is the link to the Nailgirls website so you can keep your eye out out for this product http://nailgirls.co.uk/
                       
                                  So Susan Cosmetics Universal Blush
 

This is the So Susan blush, I really like this blush because it is designed to give a natural looking flush whatever skin tone it is applied to ( it kinda works like the cc cream). You really don't need to apply a lot of this blush as it is very pigmented and also very easy to blend!.The product lasts a good length of time or until you wish to remove the blush, I wore it today and it was quiet warm outside but the So Susan blush did not lose colour nor rub off with was brilliant! I think this is the prettiest packaging for a product i have seen so far. The price of this product is £17.95, you can purchase it from http://sosusan.com/index.php?id_product=25&controller=product&id_lang=1

                       Teeez Trend cosmetics Beautiful flat stiff brush

 This is the Teeez Trend Cosmetics Beautiful flat stiff brush, I tend not to wear eye shadows because I am not that confident on applying it, but this brush definatley has made it a lot easier for me to apply eye shadows with the correct technique. With this brush you have the benefits of a stiffer brush but smooth application giving you more control when applying your favourite eye shadow. The brush is made with natural hair, I love the pattern on the handle of the brush, it has flamingos, lips and eyes. The barrel of the brush is a beautiful rose gold colour. The price of the brush is $18 (£11.20) here is a link to where glossybox says where you can buy it but I must say I did look for it but could not find it but here is the link anyway :) http://nelly.com/ww/womens-fashion

                                            Rituals... Qi Gong- Spray

This is the Rituals Qi Gong-Spray, I absolutely love this spray for many reasons, the first one being that it was a pretty hot day and I decided to use my new spray, me my partner and our son decided to have a little family outing to the park and a little walk about and I remember saying to my partner what is that gorgeous smell and then it clicked... this spray is like a plug in the wall air freshener for your body it just keeps giving you bursts of this beautiful deodorant lol! This spray has a very feminine smell which I prefer to the more casual smelling deodorants! it costs €3.50 (£2.80) here is the link :) http://eu.rituals.com/en-nl/deodorant/qi-gong----spray-50-ml-6311.html?q=QI%20GONG


I must say i am very happy with this months Glossybox, For £10 a month these are the sort of things you can receive, if you add up each price you will find that it comes to a minimum of £45... BARGAIN!
If you have not considered subscribing to Glossybox I would seriously consider it! Glossybox also does Glossydots which is where you leave a individual review on each product inside of the glossy box, each review is worth 50 glossydots and you need 1000 glossydots to recieve a free box!! 

I hope you all enjoyed this blog post/review about Glossybox. I will be reviewing each months box so keep an eye out for that.

Thanks guys! 

Tuesday 10 June 2014

Maybelline the falsies mascara and Rimmel Scandaleyes gel liner review!


Hello everyone! Hope your all okay?
Today im going to be writing a post about my new makeup purchases! As it is summer I thought I would take a couple of pictures with some flowers and take it in the sunshine! :) Im loving this hot weather at the moment, it always makes you feel happy and cheery. The last couple of days me and my boyfriend took our gorgeous sun over the park and sat in the beautiful sunshine. Anyway as I was saying before I got carried away about the sun lol, I brought these products from Superdrug when they was doing there three for two offer along with my Barry M gelly nail paints which I have already wrote a blog post about.


This is the Maybelline the falsies volum express in black, I got this in waterproof because usually at the end of the day I have no mascara left as with this one it stays on all day! I love the mascara wand its like a spoon brush which allows you to get all the lashes, it doesn't make your lashes look clumpy it makes them look natural and really long. The mascara consistency is not watery nor thick it is the right balance of both there for making it easy to apply (I wish that I brought this mascara a lot sooner!). I thought I would add a blue flower to make this picture look pretty for my blog, I really enjoyed taking the pictures too! 


This is the Rimmel Scandaleyes waterproof eye liner. I first saw this eye liner on an advert and it caught my eye and I thought I would give it a try! So I ordered it of Superdrug, I have always been a bit worried with eye liner and I have always struggled to apply eye liners easily and trying to get it to look the same thickness either side, I also struggled to get the flick to look the same, but as they say practice makes perfect but with this amazing product from Rimmel  it makes applying eye line way much easier and quicker. The gel is a creamy soft gel texture and does not clump to the brush, I don't usually like the brushes that the companies supply with their products because they usually tend to be to small for the product your using or not of a good quality, but the brush they supply with the eye liner I found to very good quality which makes the eye liner apply nicely to the eye. The brush is soft but firm enough to create a nice smooth line. I would definatley recommend this product.


Here are a couple of picture of me wearing the eye liner and mascara.

  
Here is the eye liner and mascara applied :) 


I really hope you enjoyed this review and have found it useful, feel free to comment! :)
Hopefully see you soon :)
love Catherine xxx

Monday 2 June 2014

My new purchase! Barry M Hi-shine review!


I came across these Barry M Hi-shine nail paints when I was browsing the internet for some cool new nail paints, I wanted some summer colours as I haven't got any, to be fair I started to think that my current nails polishes weren't exactly what I would call summery!! I am a big fan of Barry M nail paints especially the Hi-shine ones because of their colour range and they are so easy to apply, they also last for ages without chipping which is a bonus! seeing as I have a five month old baby boy who loves playing toys with his mummy :). Whilst I was scrolling through the variety of colours I came across three very pretty colours and thought that they would be a  great addition to my nail polish collection. They were very cheap, you can pick them up from boots and Superdrug for £3.99. I ordered my nail paints from Superdrug because they was doing a three for two offer and thought that it was a bargain!!:). The colours I brought were prickly pear, grapefruit and plum. I will give each nail paint individual reviews and also tell you what I think of them as a whole.

                                                     Prickly Pear


This is the Barry M Hi-shine Prickly Pear nail paint and I Love it! The colour is a light purple/lilac with a really nice shine to it when it it applied. I found that applying three to four coats was the right amount to achieve the Prickly Pear colour! I found with other brands that no matter how many coats you apply you just could not get the colour how it appears in the bottle. What I also loved about the nail paint is that it gave a smooth finish without it being streaky or dull. Compared to the other nail varnishes I have used this one tends to not chip as quick and some of the other  brands and the drying time for this nail paint is fairy quick!. For this review I would give a massive thumbs up for the colour and how the nail paint applies! 


                                                        Grapefruit

This is the Barry M Hi-shine grapefruit nail paint. The colour is a pinky peach colour, you only have to apply two coats to achieve the same colour as the bottle! I found that when I applied the nail paint onto my finger nails it gave a nice shiny coat but when applied to my toe nails for some reason I found that the nail paint went streaky and gloopy on the nail! I decided to give the bottle a good shake in case the first time I shook it the paint still sat at the bottom. I tried to re apply the nail paint again but once again it still seemed to be comming out streaky. I do not know if anyone else had this problem but I would love to hear if you experienced the same thing? I personally do not think I would buy the Barry M Hi-shine in the colour grapefruit but I would definitely be searching for this colour or something similar in the Barry M range because the colour its self is a very bright  pretty colour. So if using this nail paint on your finger nails I would give it a massive thumbs up but on your toe nails I would be swayed to look else where. 

                                                                        Plum


Now this colour I know is not a bright summery colour but my partner loves the colour purple so I thought I would get this for him to appreciate ;) This is the Barry M Hi-shine nail paint in the colour plum. I was a bit hesitant about this purchase because I do not tend to buy really dark colours because I find it hard to achieve a nice neat coverage and find that you have to apply a thicker coat to the nail giving you less control, resulting in very numb fingers due to much longer drying time :(  BUT I found this was not the case with Barry M plum colour. I also find that most but not all dark colours tend just to look like a different shade of black but with the Barry M plum colour you can tell that the colour on your nails is a dark purple rather than a black. This again leaves a very shiny finish to your nail which is nice to buy a product that actually does what it says it does! I would recommend this colour in the Barry M Hi-shine range. 

I hope you found this review helpful and enjoyable thanks for taking your time to read it,
I will now leave you with images of all three nail paints painted on my nails so you can see the colours once it is applied to the nails.
                                                   
                                                     
                                                                     Prickly Pear 
                                                       
                                                                     Grapefruit

Plum

Feel free to leave a comment on what other blogs you would like to see! :)
Thanks guys! xox